Saturday, March 27, 2010

(ကဆုန္လျပည့္ေန႔)

ျမတ္စြာဘုရား ပရိနိပၹာန္စံေတာ္မူခဲ့သည္ေန႔ (ကဆုန္လျပည့္ေန႔)
ကို သတိရ အမွတ္ရ၍ ျမတ္စြာဘုရား၏ ေက်းဇူးေတာ္ ဂုဏ္ေတာ္ မ်ားကို တန္ဖိုးထား
နားလည္ တမ္းတ နုိင္ေစရန္ ရည္ရြယ္၍ ျမင္းမူ ေမာင္ႏိုင္မိုး၏ ကဗ်ာ
တစ္ပုဒ္ကို မွ်ေ၀လိုက္ပါတယ္။
မၾကားခ်င္ေသာ ထိုေန႔၊ မေရာက္ခ်င္ေသာ ထိုေန႔၊ မသိခ်င္ေသာ ထိုေန႔ရယ္ပါ။ သို႔ေသာ္ ဘုန္းေတာ္ရွင္ ျမတ္စြာဘုရားေတာင္
ေရွာင္လြဲ မရေသာ ထိုေသျခင္းတရားကို သတိရ ေစခ်င္ေသာ ေစတနာျဖင့္ မွ်ေ၀ျခင္းပါ။


ရွင္အာနႏၵာ
ခမ်ာညီသား၊ျဖစ္ဘိျငား၍
ဘုရားျမတ္ရွင္၊ေရႊရုပ္သြင္ကို
မျမင္ရက္ရွာ၊ပါးမွခြါ၍
မလႅာမင္းမ်ား၊တည္းခိုနားရန္
ေဆာက္ထားအပ္ျပီ၊ဇရပ္နီး၀ယ္
စီးက်မ်က္ရည္၊တေထြေထြႏွင့္
ေ၀ဒနာခံစား၊ေနာင္ဘုရားအား
အားေတာ္ကုန္ခန္း၊ေၾကြမည့္ပန္းသို႔
ပင္ပန္းေၾကြ႔ေၾကြ႔၊ႏြမ္းေသြ႔ေသြ႔တည့္
ယေန႔ပင္လွ်င္၊နိဗၹာန္ခြင္သို႔
၀င္လိမ့္ေယာင္တကား။
ထိုအခါတြင္ ဘုရားရွင္သည္
ေခၚငင္ေလပါ၊အာနႏၵာဟု
ေရာက္လာထံပါး၊ ညြတ္ခစားေသာ္
ခ်စ္သား အာနႏၵာ.........
တဏွာဟူေသာ၊ ထိုသေဘာေၾကာင့္
ျဖစ္ေသာခႏၵာ၊ပ်က္ျမဲသာတည္း
ျဗဟၼာသိၾကား၊ဘုရားေသာ္လည္း
ပ်က္စီးျမဲပင္၊က်ိဳးေၾကာင္းယွဥ္
သိျမင္ေစျငား၊သင္တို႔အားလွ်င္
ေဟာၾကားထပ္ထပ္၊ဆံုးမအပ္ခဲ့
သည္းပြတ္ေၾကြႏိုး၊ပူပန္စိုးလည္း
အက်ိဳးမထူး၊မိန္႔ျမြတ္ဖူးျပီ။
ခ်စ္သား အာနႏၵာ
ငါဘုရားကို၊သင္ၾကည္ညိဳ၍
ရိုေသတုပ္ပ်က္၊ျပဳစုအပ္ခဲ့
ခ်ဥ္းကပ္ေန႔ဆက္၊၀တ္မပ်က္ဘဲ
မ်က္သစ္ဒန္ပူ၊ေပးအပ္လွဴခဲ့
ယူေတာ္မူပါ၊ သံုးေတာ္မူပါ
ေနေတာ္မူပါ၊ ေလ်ာင္းေတာ္မူပါ
ေလွ်ာက္တင္ပါလ်က္၊ေမတၱာကာယကံ
ေမတၱာ၀စီကံ၊ေမတၱာမေနာကံ
ျပည့္သည္မွန္သား
ကံသံုးျဖာနွင့္၊လုပ္ေကၽြးသင့္သည္
သင့္၀န္သင့္တာ၊ေက်ပြန္ပါျပီ
ပညာလံုလ ၾကီးမားလွသို႔
ျပည့္၀သမာဓိ၊သင့္၀ယ္ရိွသည္
ႏိႈင္းရွည္ဆင္ျခင္၊ဥာဏ္ေျမာ္ျမင္...ဟု
ရွင္အာနႏၵာ၊ေျဖသာေစျငား
ျမတ္တရားႏွင့္
ေဟာၾကားေတာ္မူရွာသည္တကား။
ထိုမွလြန္ေျမာက္၊ခ်ိန္သင့္ေရာက္ေသာ္
ေနာက္ပါတပည့္သား၊ သံဃာမ်ား၌
မွာထားသင့္ရာ၊က်င့္အပ္စြာကို
အာနႏၵာရွင္၊သက္ေသတင္လ်က္
စံုလင္မိန္႔မွတ္၊နာေစအပ္ကာ
သုဘဒ္ပုရပိုဇ္၊ရဟန္း၌လည္း
အျမိဳက္ခ်မ္းသာ၊ျမတ္ဓမၼာႏွင့္
ရဟႏၱာရွင္ျမတ္၊ျဖစ္ေစအပ္ခဲ့
ျမတ္ထြတ္ေခါင္ဖ်ား၊ျမတ္ဘုးရားသည္
ေဟာၾကားမိန္႔မွာ၊ေနာက္ဆံုးခါတြင္.....။
ဟႏၵဒါနိ ဘိကၡေ၀၊ အာမႏၱယာမိ
ေ၀ါ၀ယဓမၼာ ၊ သခၤါရာ
အပ၌မာေဒန သမၼာေဒထ
သခၤါရတရားဟူသည္ကားလွ်င္
ေဖာက္ျပားမလြဲ၊ပ်က္တတ္ျမဲတည့္
စြဲမွတ္ေစ့ေစ့
မေမ့ေလ်ာ့၊မေပါ့မလစ္
ျဖစ္တံုသတိ၊ ျပည့္စံုဘိေလာ့
ပစၦိမစကား၊ေဟာမိန္႔ၾကား၏
ေဟာၾကားျပီးက ၊ျမတ္ဗုဒၵလည္း
ပထမစ်ာန္၊ဒုတိယစ်ာန္
တတိယစ်ာန္၊စတုတၳစ်ာန္
အျပန္ျပန္လွ်င္
စ်ာန္ေတာ္အဆင့္ဆင့္၊၀င့္စားလင့္လ်က္
ပြင့္၀တ္ေၾကြတံု၊ၾကာပဒံုသို႔
အာရံုတက္နီး၊လင္းအားၾကီး၀ယ္
ျဖည့္ဆည္းပါရမီ၊ကာလရွည္စြာ
ရည္ေမွာ္အမတ၊နိဗၹာန္နသ္ို႔
ျမန္းၾကြေတာ္မူသတည္း။
ထိုေရာ္အခါ
မဟာပထ၀ီ၊ေျမသည္တုန္ဟည္း
သိမ့္သိမ့္ၾကည္းလွ်င္၊ေတာလည္းပဲ့တင္
နမိတ္တင္၏၊လူရွင္ရဟန္း
ရိုက္ငင္ပန္း၍၊ျမည္တမ္းျပင္းစြာ
ငိုေၾကြးပါ၏ ၊ စၾကာ၀ဠာ
ကမာၻတိုင္တစ္ေသာင္း
ျခိမ့္ျခိမ့္ေညာင္းမွ်
အေပါင္းနတ္ျဗဟၼာ၊စုေ၀းလာ၍
မဟာပရိနိဗၹာန္၊စံေတာ္မူလတ္
သံုးလူနတ္တို႔၊ဆြတ္တမ္းဦးခ်
ဖူးေျမာ္ၾက၏။
ဂါထာ ဂါထာ အျဖာျဖာႏွင့္
ျဗာဟၼာမင္း၊သိၾကားမင္း ပူေဇာ္ႏွင္း၏
ေသျခင္းတရား ဟူသည္ကားလွ်င္
အားေတာ္ဆယ္တန္၊ဥာဏ္ေတာ္ဆယ္ပါး
ျပည့္စံုျငားသည့္
ဘုရာေသာ္မွ၊ေရွာင္မရသည္
မရဏေတာ၊ကုေတာမုစၥတိ
အစရိွသည္
သဟမၹတိ ျဗဟၼ ဆိုရြတ္ပါသို႔
အနိစၥာ သတ သခၤါရာ
ဥပၹါဒ ၀ယ ဓမၼိေနာ
ျဖစ္သာ ပ်က္ေသာ ၊သေဘာမွန္စြ
သခၤါရတည့္
သုခအမွန္၊ျပည္နိဗၹာန္သာ
ရည္သန္လိုရင္း၊သိၾကားမင္းလည္း
ေဆာင္ႏွင္းဂါထာ၊ပူေဇာ္ပါ၏
ရဟနၱာ အသီသီး၊ထိုနည္းတူစြာ
ဂါထာအမ်ား၊ရြတ္ဖတ္ပြားလ်က္
တရားသံေ၀၊၀ွန္လိႈက္ေျခြ၏
ေျဖရာခက္ျငား၊နတ္လူမ်ားကား
ဖားလ်ားဆံျပိဳ၊ဖရိုဖရဲ
လြင့္ေျမာက္က်ဲလ်က္၊ငိုပြဲၾကီးစြ
သည္းထန္လွသည္
လျပည့္ကဆုန္ညပါတကား။ ။
(ျမင္းမူ ေမာင္နိုင္မိုး)

Sunday, March 7, 2010

တိရိစၦာန္ေလာကမွ မယံုႏိုင္ဖြယ္ခ်စ္ဇာတ္လမ္းေလး


သူ႔ခ်စ္သူငွက္မေလး ထိခိုက္ဒဏ္ရာရထားေတာ့ စိုးထိတ္ေျခာက္ျခားေနရွာတဲ့ငွက္ကေလး

သူ႔ခ်စ္သူငွက္မေလးအတြက္ အစာေတြသယ္လာ။ အၾကင္နာက႐ုဏာေတြ ေပးေနရွာတဲ့ငွက္ကေလး

အစာေတြသယ္လာေပးေနရွာတုန္းရုတ္
တရက္ေသဆံုးသြားရွာတဲ့ ငွက္မေလးကို မယံုၾကည္ႏိုင္စြာနဲ႔ လႈပ္ႏိႈးသယ္ယူသြားဖို႕ ႀကိဳးစားေနရွာတဲ့ငွက္ကေလး


သူ႔ခ်စ္သူငွက္မေလး သူဆီဘယ္ေတာ့မွေနာက္တဖန္ ျပန္လာႏိုင္ေတာ့မွာမဟုတ္ဘူးဆိုတာကို သေဘာေပါက္နားလည္သြားတဲ့အခါ ခ်စ္ျခင္းႀကီးစြာနဲ႔ ငိုေၾကြးေနရွာတဲ့ ငွက္ကေလး


ခ်စ္သူငွက္မေလးေဘးမွမခြာႏိုင္ဘဲ ခ်စ္သူေသဆံုးမႈအတြက္ ငိုေၾကြးေအာ္ဟစ္ေနရွာတဲ့ငွက္ကေလး

ေနာက္ဆံုး ေနာက္ဆံုးမွာေတာ့ သူ႔ခ်စ္သူငွက္မေလး သူဆီဘယ္ေတာ့ ဘယ္ေတာ့မွ ျပန္လာေတာ့မွာ မဟုတ္တာကို၊ သူကိုထာ၀ရခြဲခြာသြားၿပီဆိုတာကို သိလိုက္ရတဲ့ေနာက္ ခ်စ္သူခႏၶာကိုယ္ေဘးမွာ ရပ္ရင္း ၀မ္းနည္းေၾကကြဲေနရွာတဲ့ ငွက္ကေလး

ဒီအျဖစ္အပ်က္ေလးဟာ ယူကရိန္းႏိုင္ငံမွာ ျဖစ္ပ်က္ခဲ့ၿပီး၊ ဓာတ္ပံုေတြကို ငွက္ဖိုေလးက သူ႔ငွက္မေလးကို ကယ္တင္ဖို႔ ႀကိဳးစားေနစဥ္မွာ ႐ိုက္ယူထားခဲ့တာျဖစ္ပါတယ္။ အေမရိကနဲ႔ ဥေရာပမွာရိွတဲ့ လူသန္းေပါင္းမ်ားစြာဟာ ဒီဓာတ္ပံုေလးေတြကို ၾကည့္ၿပီးၾကတဲ့အခါ မ်က္ရည္က်ခဲ့ၾကပါတယ္။
ဓာတ္ပံုဆရာက ျပင္သစ္ႏိုင္ငံမွာရိွတဲ့ အေက်ာ္ၾကားဆံုးသတင္းစာကို ဒီဓာတ္ပံုေတြကို မဆိုစေလာက္ေစ်းနဲ႔ ေရာင္းခ်ခဲ့ပါတယ္။ ဒီဓာတ္ပံုပါတဲ့ သတင္းစာဟာ ေနခ်င္းပဲ လက္မလည္ေအာင္ ေစာင္ေရမက်န္ ေရာင္းခ်ခဲ့ရပါတယ္။

Friday, March 5, 2010

ဗဟုသုတဆိုင္ရာ,

ဘယ္ေလာက္လုပ္ႏုိင္တယ္
ဆုိတာက အေရးမၾကီးပါဘူး။
လုပ္တဲ့အထဲမွာ
ဘယ္ေလာက္ ႏွစ္ႏွစ္ျခိဳက္ျခိဳက္
လုပ္ႏုိင္တယ္ ဆုိတာက
ပိုၿပီး အေရးၾကီးပါတယ္။


Inspired (made in myanmar) 30082007
-----------------------

ကုိယ္သိတယ္လို႕ ထင္ထားတာနဲ႕
ကိုယ္တကယ္သိတာနဲၾကားမွာ
ကြာဟခ်က္ေတြ အမ်ားၾကီးရွိတယ္။


Inspired (made in myanmar) 21082007
-----------------------

မွန္ကန္ေသာ စိတ္စြမ္းအင္ဟာ
လုပ္ေဆာင္သမွ် အလုပ္တုိင္းကို
အက်ဳိးရွိစြာ ၿပီးစီးေအာင္ျမင္ႏုိင္တယ္။


Inspired (made in myanmar) 19082007
-----------------------

လုပ္ပိုင္ခြင့္ ရွိေပမဲ့
လုပ္ခ်င္တုိင္း
လုပ္လို႕ မရဘူး


Inspired (made in myanmar) 18082007
-----------------------

သိၿပီးသားပါလို႕ ဆုိတာထက္
နားလည္ေအာင္ အရင္ၾကိဳးစားပါ။


Inspired (made in myanmar) 14082007
-----------------------

ပ်င္းရင္ ဖ်င္းတတ္တယ္။
ဖ်င္းရင္ သုံးစားလုိ႕ မရဘူး။


Inspired (made in myanmar) 12082007
-----------------------

မွန္ေသာအၾကံဥာဏ္ မရွိ။
အၾကံဥာဏ္ကုိသာ
မွန္ေအာင္လုပ္ပါ။


Inspired (made in myanmar) 11082007
-----------------------

လုပ္ၿပီး မသိတာနဲ႕
မသိဘဲနဲ႕ လုပ္တာဟာ
အတူတူဘဲ။


Inspired (made in myanmar) 10082007
-----------------------

အျမင့္တက္ရင္
ဂီယာနံပါတ္ၾကီးနဲ႕
တက္ရသလို

ဘ၀အဆင့္ဆင့္
တက္ဖို႕အတြက္လည္း
စိတ္ဓါတ္ၾကီးၾကီးနဲ႕
တက္ရမယ္။


Inspired (made in myanmar) 09082007
-----------------------

အရင္မလိုပါနဲ႕။
စနစ္တက်လုပ္ပါ။
ျဖစ္စရာရွိတာ
ျဖစ္လာမယ္။


Inspired (made in myanmar) 08082007
-----------------------

မွန္တာေတြကို လုပ္ျဖစ္ေအာင္
ၾကိဳးစားပါ။
လုပ္တာေတြကိုလည္း မွန္ေအာင္
ၾကိဳးစားပါ။


Inspired (made in myanmar) 07082007
-----------------------

သိၿပီး မလုပ္
လုပ္ၿပီး မသိ
ႏွစ္ခုလုံး မေကာင္းဘူး။
သိလည္းသိ
လုပ္လည္းလုပ္ပါ။


Inspired (made in myanmar) 06082007
-----------------------

စည္းကမ္းရွိရွိ ေက်နပ္မႈနဲ႕
လုပ္တဲ့အလုပ္မွာ ေပ်ာ္ရႊင္ဖုိ႕ဟာ
ဘ၀အတြက္ အေရးၾကီးေသာ
လိုအပ္ခ်က္ပါ။


Inspired (made in myanmar) 05082007
-----------------------

ေက်းဇူးရွိ၊ ေက်းဇူးသိ
တပ္ႏုိင္သမွ် ေက်းဇူးဆပ္ပါ။
ေက်းဇူး မကန္းပါနဲ႕။


Inspired (made in myanmar) 04082007
-----------------------

တန္ဖုိးသည္ လိုအပ္ခ်က္ေပၚမူတည္ၿပီး
အတက္အက် ရွိတယ္။


Inspired (made in myanmar) 03082007
-----------------------

ကံၾကမၼာကုိခ်ည္း မယုံနဲ႕
ကုိယ့္ကုိယ္ကုိ ၾကည့္ပါ
မိမိ မသိတာကုိ ေလ့လာပါ။


Inspired (made in myanmar) 02082007
-----------------------

သင္ယူ ေလ့လာမႈဟာ
မလုပ္မေနရအလုပ္ မဟုတ္ေပမဲ့
ဘ၀ရွင္သန္ဖို႕ အတြက္ေတာ့
မျဖစ္မေန လုပ္ကုိ လုပ္ရမယ္။


Inspired (made in myanmar) 01082007
-----------------------


ပစၥည္းဥစၥာဆုိတာ
ပုိင္ဆုိင္မႈထက္
အသုံးက်ေအာင္
အသုံးခ်ႏုိင္ဖို႕က
ပုိအေရးၾကီးပါတယ္။


Inspired (made in myanmar) 31072007
-----------------------

သူတပါးက အကူအညီေပးေပမဲ့
မိမိကုိယ္တုိင္က အားစုိက္ဖုိ႕လုိေသးတယ္။

Inspired (made in myanmar) 30072007
-----------------------

အရွိန္အ၀ါဆုိတာ ႂကြားဖို႕မဟုတ္ဘူး။
လုပ္တဲ့အလုပ္ ပိုၿပီး ေခ်ာေမြ႕ေအာင္
အသုံးခ်ဖို႕အတြက္ဘဲ ျဖစ္တယ္။

Inspired (made in myanmar) 29072007
-----------------------

အလုပ္မွာ အဓိက မိမိရဲ႕ တာ၀န္က
ကုိယ္နဲ႕ထိေတြ႕ ဆက္ဆံမႈအရာတုိင္းမွာ
အေကာင္းဆုံးလုပ္ေဆာင္ဖို႕နဲ႕
အရာရာကို အျပဳသေဘာျဖင့္
ေ၀ဖန္ အၾကံျပဳဖုိ႕ျဖစ္တယ္။

Inspired (made in myanmar) 28072007
-----------------------

ေအာင္ျမင္မႈအတြက္
ထုိက္တန္တဲ့ အရင္းအႏွီး
ျဖည့္တင္းဖို႕ လိုပါတယ္။


Inspired (made in myanmar) 27072007
-----------------------

စစ္မွန္တဲ့ ၿငိမ္းခ်မ္းမႈ႕ကုိ
ေတာင့္တလိုလားၾကေသာ္လည္း
လက္ေတြ႕မွာ တကယ္ရေအာင္လုပ္ဖို႕
အင္မတန္ ၀န္ေလးေနတက္ပါတယ္။

Inspired (made in myanmar) 26072007
-----------------------

ၾကဳံရာ က်ပန္း လုပ္မယ္ဆုိရင္ေတာင္
စနစ္တက် လုပ္ဖို႕လုိပါတယ္။

Inspired (made in myanmar) 25072007
-----------------------

ပီတိစားၿပီး အားရွိဖို႕ဆုိတာ
ကုိယ္ကုိယ္တုိင္က
အရင္ရိကၡာျဖည့္ထားဖုိ႕လုိတယ္။


Inspired (made in myanmar) 24072007
-----------------------

တာ၀န္သိတဲ့သူမွာ တာ၀န္ရွိတယ္
တာ၀န္ရွိတဲ့သူမွာ တာ၀န္ပိတယ္။
ဥာဏ္ယွဥ္ၿပီး တာ၀န္ေက်ေအာင္လုပ္ပါ။

Inspired (made in myanmar) 23072007
-----------------------

ေမးပါမ်ား စကားရဆုိေပမဲ့
သူမ်ားအျမင္ကပ္ေအာင္
မေမးမိဖို႕ သတိထားရမယ္။

Inspired (made in myanmar) 22072007
-----------------------

ေအာင္ျမင္မႈတစ္ခုရဖုိ႕ ခဲယဥ္းတယ္။
အဲဒီေအာင္ျမင္မႈကုိ ဆက္လက္ထိန္းသိမ္း ဖုိ႕က ပုိၿပီးခက္ပါတယ္။
အဲဒါေတြထက္ကုိ ဘ၀မွာ ေအာင္ျမင္ေသာသူ ျဖစ္ဖုိ႕ကေတာ့ အခက္ဆုံးပါဘဲ။

Inspired (made in myanmar) 21072007
-----------------------

ျမန္ျမန္လုပ္
မ်ားမ်ားလုပ္
မမွားေစနဲ႕။

Inspired (made in myanmar) 20072007
-----------------------


လူတုိင္း လူတုိင္း ကုိယ့္စိတ္ကို
မွန္ကန္တဲ့ လမ္းေၾကာင္းေပၚမွာ တင္ၿပီး
ျပဳမူ ေျပာဆုိဖို႕ တာ၀န္ရွိတယ္။
ဒါကိုေမ့လုိ႕မရဘူး။

Inspired (made in myanmar) 19072007

ပရဟိတ စိတ္

ေရရွည္စိတ္ခ်မ္းသာေပ်ာ္ရႊင္မႈအတြက္ မိမိရည္မွန္းခ်က္ထေျမာက္ေအာင္ျမင္ေရးကုိ အေလးေပးေဆာင္ရြက္ရမည္ဆုိေသာ္လည္း အတၱအက်ဳိးစီးပြားကုိခ်ည္း အၿမဲဦးစားေပးမေနမိေအာင္ကား သတိျပဳရန္လုိပါသည္။


ျမန္မာ့ရုိးရာတြင္ အမ်ားက်ဳိးေဆာင္ ကုိယ့္က်ဳိးေအာင္ဟူေသာစကားတစ္ခြ
န္းရွိသည္။ အတၱအက်ဳိးႏွင့္ ပရအက်ဳိးဆက္စပ္ပတ္သက္ေနသည္ဆုိေသာသေဘာ။ သည္သေဘာကုိပင္ တရုတ္ပညာရွိႀကီး ကြန္ျဖဴးရွပ္စ္က " အမ်ားေကာင္းက်ဳိး သယ္ပုိးမည့္သူ႔၌ မိမိအက်ဳိးပါ ေသခ်ာၿပီးျဖစ္သည္" ဟူ၍ဆုိခဲ့သည္။


ေကာင္းေသာအလုပ္ လုပ္သူသည္ ထိုလုပ္ရပ္က ေပးသည့္ ဆုလာဘ္ကုိ ခံစားရၿမဲျဖစ္သည္။ ဘယ္သူေတြကုိ သူကူညီႏုိင္မလဲ၊ ဘာေတြ သင္ကူညီႏုိင္မည္လဲ၊ ပတ္၀န္းက်င္မွာၾကည့္မွာ။ သင့္ၿမိဳ႕သင့္ရြာ၊ ၿပီးေတာ့ သင့္မိသားစု၊ သင့္ေဆြမ်ဳိး၊ သင့္မိတ္ေဆြ၊ သင့္လုပ္ေဖာ္ကုိင္ဖက္၊ အေၾကာင္းအားေလ်ာ္စြာေတြ႔ႀကဳံသိကၽြမ္း မ်က္မွန္းတမ္းမိသူမ်ား၊ သူတုိ႔အက်ဳိးအတြက္ သင္ဘာေတြ ဘယ္ေလာက္ သယ္ပုိးေပးႏုိင္သနည္း။ သင္ေဆာင္ရြက္သည့္အတုိင္းအတာႏွင့္ တူညီေသာ အက်ဳိးကုိ သင္ခံစားရမည္ျဖစ္သည္။

ဥပမာ သူတစ္ပါးထံမွ ေလးစားခ်စ္ခင္မူကုိ လုိသည္ဆုိပါစုိ႔။ ဦးစြာပထမ မိမိက ေလးစားေၾကာင္းျပရလိမ့္မည္။
ကုိယ္ေလးစားလွ်င္ သူေလးစားလာလိမ့္မည္။ မယုံမရွိႏွင့္။ တစ္လေလာက္ စမ္းၾကည့္ပါ။ လမ္းမွာ၊ အိမ္မွာ၊ ရုံးမွာ၊ တစ္ဦးခ်င္းေတြ႔ရသူ အသီးသီးကုိ တကယ္အေရးပါေသာ ပုဂၢိဳလ္မ်ားသဖြယ္ သေဘာထားၿပီး ဆက္ဆံၾကည့္ပါ။

လူဆုိသည္က အေရးပါခ်င္သူခ်ည္းျဖစ္သည္။ အေရးတယူျပဳခံခ်င္သူခ်ည္းျဖစ္သည္။ ၿပီး လူအမ်ားအျပားပင္မိမိကုိ တျခားလူေတြ အေရးတယူျပဳသေလာက္ မျပဳဟု ထင္မွတ္ခံစားေနတတ္ၾကသည္။ သူတုိ႔ကုိ သင္က အေရးတယူျပဳလုိက္သည့္အခါ သူတုိ႔အလုိဆႏၵေတြ ျပည့္၀ၾကသည္။ သင္ႏွင့္ ေတြ႔သျဖင့္သူတို႔စိတ္ခ်မ္းသာၾကသည္။ သည္အတြက္သင့္အား ေက်းဇူးတင္သည္။ ခင္မင္သည္၊ ေလးစားသည္။ သင့္မွာ အေၾကာင္းႀကီးငယ္ရွိလွ်င္ေစတနာဗရပြႏွင့္ သင့္အား ကူညီၾကမည္။

တဖန္ တစ္ဖက္သားကုိ ေလးစားစြာဆက္ဆံႏုိင္ရန္အတြက္ ထုိသူ၏ အေရးကိစၥမ်ား၊ ၎၏ အယူအဆႏွင့္ ခံစားခ်က္မ်ားအေပၚ စိတ္၀င္စားမႈရွိရန္လုိ၏ စင္စစ္ ထုိစိတ္၀င္စားမႈမွလည္း ႀကီးမားေသာ အက်ဳိးေက်းဇူးရႏုိင္ေသး၏။ ေလာကလူသားတုိင္းမွာပင္ သူမ်ားႏွင့္မတူေသာ အေတြ႔အႀကံဳႏွင့္ အေတြးအျမင္မ်ားရွိတတ္ၾကသည္ျဖစ္ရာ လူအမ်ားကုိ စိတ္၀င္စားသူသည္ ေလာကအေၾကာင္း လူ႔အေၾကာင္းကုိ သူတကာထက္ ႏွံ႔စပ္သိျမင္သူျဖစ္လာႏုိင္ေပသည္။

TIME

  • အခ်ိန္တစ္ခုက ေမြးဖြားဖို႔၊ အခ်ိန္တစ္ခုက ေသဆံုးဖို႔
    A time to be born, and a time to die;


  • အခ်ိန္တစ္ခုက စတင္ဖို႔၊ အခ်ိန္တစ္ခုက မယိုင္လဲေအာင္ မနည္း အားတင္းထားဖို႔
    A time to plant, and a time to pluck up what is planted;


  • အခ်ိန္တစ္ခုမွာ ဖ်က္ဆီးဖို႔၊ အခ်ိန္တစ္ခုမွာ ျပင္ဆင္ ကုသဖို႔
    A time to kill, and a time to heal;


  • အခ်ိန္တစ္ခုက ၿပိဳက်ဖို႔၊ အခ်ိန္တစ္ခုက တည္ေဆာက္ဖို႔
    A time to break down, and a time to build up;


  • အခ်ိန္တစ္ခုက ငိုေၾကြးဖို႔၊ အခ်ိန္တစ္ခုက ရယ္ေမာဖို႔
    A time to weep, and a time to laugh;


  • အခ်ိန္တစ္ခုက ဝမ္းနည္းပူေဆြးဖို႔၊ အခ်ိန္တစ္ခုက ေပ်ာ္ရႊင္ ကခုန္ဖို႔
    A time to mourn, and a time to dance;


  • အခ်ိန္တစ္ခုက အေဝးကို ပယ္ထုတ္ဖို႔၊ အခ်ိန္တစ္ခုက အနီးနား အတူရွိေနဖို႔
    A time to throw away stones, and a time to gather stones together;


  • အခ်ိန္တစ္ခုက ေပြ႔ဖက္ဖို႔၊ အခ်ိန္တစ္ခုက ေရွာင္ဖယ္ဖို႔
    A time to embrace, And a time to refrain from embracing;


  • အခ်ိန္တစ္ခုက အက်ိဳးရွိရွိအသံုးခ်ဖို႔၊ အခ်ိန္တစ္ခုက ျဖဳန္းတီးဖို႔
    A time to seek, and a time to lose;


  • အခ်ိန္တစ္ခုက ထိန္းသိမ္းထားဖို႔၊ အခ်ိန္တစ္ခုက စြန္႔လႊတ္ဖို႔
    A time to keep, and a time to throw away;


  • အခ်ိန္တစ္ခုက ဆုတ္ၿဖဲဖို႔၊ အခ်ိန္တစ္ခုက ဖာေထးဖို႔
    A time to tear, and a time to sew;


  • အခ်ိန္တစ္ခုက ဆိတ္ဆိတ္ေနဖို႔၊ အခ်ိန္တစ္ခုက စကားေျပာေနဖို႔
    A time to keep silence, and a time to speak;


  • အခ်ိန္တစ္ခုက ခ်စ္ဖို႔၊ အခ်ိန္တစ္ခုက မုန္းဖို႔
    A time to love, and a time to hate,


  • အခ်ိန္တစ္ခုက စစ္ပြဲ၊ အခ်ိန္တစ္ခုက ၿငိမ္းခ်မ္းျခင္း
    A time for war, and a time for peace.

Thursday, March 4, 2010

ဆီးခ်ဳိေ၇ာဂါႏွင္႔႔ကုထ့ံုး


ဆီးခ်ဳိေ၇ာဂါျဖစ္ျခင္းဟာ ဇိမ္ခံမူမ်ားျခင္း၊ ကုိယ္လက္လူပ္၇ွားမွဳနည္းျခင္း၊ အအိပ္အေနမ်ားျခင္း၊ အထုိင္မ်ားျခင္း တုိ႔ေၾကာင္႔ျဖစ္ပါတယ္။

ဆီးခ်ဳိေ၇ာဂါ လကၡဏာမ်ားကေတာ႔၊

၁။ ေ၇အလြန္ငတ္ျခင္း၊

၂။။ အလြန္ေမာပန္းျခင္း၊

၃။ ဆီးမ်ားျပီးဆီးမၾကာခဏသြားျခင္း၊

၄။ ညဘက္တြင္ဆီးသြားမ်ားျခင္း၊

၅။ ဆီးမ်ားျပီးမၾကာခဏသြားျခင္း၊

၆။ ဆီးသြားျပီးဆီးတြင္ ပု၇ြက္ဆိတ္အုံလာျခင္း၊

၇။ ခႏၶာကုိယ္တစ္ခုလုံး ကုိက္ခဲအေၾကာတက္ျခင္း၊

၈။ အစားေသာက္ပ်က္ျခင္း၊

၉။ အိပ္မေပ်ာ္ျခင္း၊

၁၀။ ကုိယ္အေလးခ်ိန္ေလ်ာ႔က်ျခင္း၊

၁၁။ အနာမ်ဴိးစံုေပါက္လာျခင္း၊

၁၂။ အနာမ်ားေတာ္ေတာ္နဲ႔ မက်က္နုိင္ျခင္း၊

၁၃။ မ်က္စိအျမင္ခ်ဳိ႕ယြင္းလာျခင္းတုိ႔ဟာ ဆီးခ်ဳိေ၇ာဂါလကၡဏာမ်ား ျဖစ္ပါတယ္။

အပူနာေၾကာင္႔ျဖစ္တဲ႔ ဆီးခ်ဳိေ၇ာဂါဆုိ၇င္..

၁။ အခ်ဳိမ်ားတဲ႔အစာ၊

၂။ အဆီမ်ားတဲ႔အစာ၊

၃။ အပူစာမွန္သမွ်ကုိ ေ၇ွာင္ၾကဥ္ခုိင္း၇ပါတယ္။ ေအးတဲ႔အစာ၊ ခ်ဥ္တဲ႔အစာ၊ ေအးခါးတဲ႔ ေဆးအစာတုိ႔ကုိ စားသံုးခုိင္း၇ပါတယ္။

အေအးနာေၾကာင္႔ျဖစ္တဲ႔ ေ၇ာဂါဆုိ၇င္

၁။ အခ်ဳိမ်ားတဲ႔ အစာ၊

၂။ အဆီမ်ားတဲ႔ အစာ၊

၃။ အေအးစာ မွန္သမွ်ကုိ ေ၇ွာင္ၾကဥ္ျပီး ပူတဲ႔၊ ခါးတဲ႔၊ စပ္တဲ႔ ပူခါးတဲ႔ေဆး၊ အစာမ်ားကုိ စားျပီး တုိက္ေကြ်း၇ပါတယ္။

ဆီးခ်ုဳိေ၇ာဂါျဖစ္သူ လူနာတုိင္းကုိ အခ်ဳိစားသံုးျခင္း ေ၇ွာင္ၾကဥ္ ခုိင္း၇ပါတယ္။ ဒါေပမယ္႔ အခါးမွန္သမွ်ကုိ မေကြ်း၇ပါ။ မစားခုိင္းပါ။ အဆီမွန္သမွ်ကုိေတာ႔ စားသုံးျခင္းကုိ ေ၇ွာင္ၾကဥ္ ခိုင္းပါတယ္။ ဒါအဓိက အေ၇းၾကီးတဲ႔ ေသာ႔ခ်က္ပါ။

အပူေၾကာင္႔ျဖစ္တဲ႔ ဆီးခ်ဴိေ၇ာဂါ၇ွင္မ်ား ေ၇ွာင္ၾကဥ္ ၇မယ္႔ အစားအစာမ်ားကေတာ႔

ၾကက္သား၊ ၾကက္ဥ၊ ႏြားသား၊ ဆိတ္သား၊ ႏြားႏုိ႔၊ ဆိတ္ႏုိ႔၊ ေထာပတ္၊ အုန္းႏုိ႔၊ ထန္းလ်က္၊ ပ်ား၇ည္၊ ေကာက္ညွင္း၊ အုန္းထမင္း၊ ဒံေပါက္ထမင္း၊ ေထာပတ္ထမင္း၊ ေခြးေတာက္၇ြက္၊ ေၾကာင္လွ်ာသီး၊ ေၾကာင္လွ်ာညႊန္႔၊ ဖန္ခါးသီး၊ မဲဇလီ၇ြက္၊ မဲဇလီဖူး၊ ဆင္တုံးမႏြယ္၊ နႏြင္းခါး၊ တမာ၇ြက္၊ တမာေခါက္၊ ခ၇မ္းခါးသီး ၊ ခ၇မ္းခ်ဳိသီး၊ င၇ုတ္သီး၊ င၇ုတ္ေကာင္း တုိ႔ကုိေ၇ွာင္ၾကဥ္၇ပါမယ္။

မ်က္ႏွာေလး၀င္းပလွပေစဖုိ႔

Cleaning အရင္လုပ္ပါ။

မ်က္နွာေပၚက သနပ္ခါး၊ မိတ္ကပ္နဲ႔ ေခ်းေညွာ္မ်ားကုိ ဖယ္ရွားပစ္ဖုိ႔ အတြက္ျဖစ္ပါတယ္။ အဲဒါကုိ ဖယ္ရွားပစ္ဖုိ႔ အတြက္ မိမ္ိသုံးေနက် ျဖစ္ျပီး ကုိယ္႔အသားအေရ နဲ႔ သင္႔ေတာ္တဲ႔ Cleaning Milk တစ္မ်ိဳးကုိ အသုံးျပဳျပီး ဖယ္ပစ္ပါ။ ျပီးေတာ႔ မ်က္နွာကုိ Massage လုပ္ျပီး ႏွိပ္နယ္ေပးပါ။

Peeling လုပ္ပါ။

မ်က္ႏွာျပင္ေပၚက ဆဲလ္အေသေတြကုိ ဖယ္ရွားပစ္ဖုိ႔ Peel လုပ္ဖုိ႔ အတြက္ ကုိယ္နွစ္သက္ရာ Lotion တစ္မ်ိဳးမ်ိဳးကုိ မ်က္ႏွာအႏွံလိမ္းထား ရပါမည္။ ေျခာက္ေသြ႕သြားတဲ႔ အခါ ဂြမ္းမွာေရ ဆြတ္ျပီး ဖယ္ရွားပစ္ပါ။


Steaming ကတတိယအဆင္႔ပါ

ကုိယ္႔ရဲ႕ မ်က္နွာဟာ အဆီျပန္ ျပီး ဆား၀က္ျခံေတြသိပ္မ်ား ေနတယ္ဆုိရင္ေတာ႔ ဒီအဆင္႔ ကုိဆက္လုပ္သင္႔ ပါတယ္။ ေရေႏြးပူပူကုိ အ၀က်ဥ္းတဲ႔ ဇလုံတစ္ခု မွာထည္႕ပါ။ ျပီးေတာ႔ ဇလုုံအ၀ကုိ ပ၀ါပါး တစ္ခုနဲ႔ အုပ္ထားပါ။ ျပီးေတာ႔မွ အဲဒီပ၀ါစအထက္ ကေနထြက္ေနတဲ႔ ေရေႏြးေငြ႕ နဲ႔မ်က္နွာျပင္ကုိ ထိေတြ႕ ေစရပါမယ္။ သံုးမိနစ္ကေန ငါးမိနစ္ခန္႔ လုပ္ေပးပါ။ ျပီးေတာ႔ ဆား၀က္ျခံ ေတြကုိ ညွစ္ေပးပါ။


Mark ကစတုတၳ

ေခ်းထုတ္ျပီး ၀က္ျခံညွစ္ျပီးသား မ်က္နွာျပင္ကုိ ရရွိသြားပါျပီ။ ဒါေပမယ္႔ မ်က္ႏွာကုိ တင္းရင္ေစဖုိ႔ နဲ႔ အစိုဓာတ္ရရွိေစဖုိ႔ ကေတာ႔ ေပါင္းတင္ေပးရပါမယ္။ ကုိယ္႔ဘာသာ အိမ္မွာ ေပါင္းတင္လုိ႔ရတဲ႔ နည္းမ်ားမွာ

အဆီပ်ံလြန္တဲ႔ အသားရည္

ၾကက္ဥ အကာနဲ႔ သံပရာရည္ကုိ သမေအာင္ ေရာျပီး မ်က္ႏွာမွာလိမ္းပါ။ ျပီးေတာ႔ အေပၚကေန တစ္ရႈး ပါးပါးေလး အုပ္ထားပါ။ ဒီနည္းအတုိင္း ဆယ္႔ငါးမိနစ္လာက္ေနေပးပါ။

ေျခာက္ေသြ႕တဲ႔ အသားရည္

ၾကက္ဥအႏွစ္နဲ႔ သံပရာရည္ကုိ သမေအာင္ ေရာျပီးမ်က္နွာမွာလိမ္းပါ။ ျပီးေတာ႔ အေပၚကေန တစ္ရႈး ပါးပါးေလးအုပ္ထားပါ။ ဒီနည္းအတုိင္း ဆယ္႔ငါးမိ္နစ္ေလာက္ေနေပးပါ။

သာမာန္ အသားရည္

သဘာ၀ပ်ားရည္ စစ္စစ္နဲ႔ မ်က္နွာကို ထူထပ္စြာ လိမ္းျပီး ဆယ္႔ငါးမိနစ္ေလာက္ Mark လုပ္ထားပါ။ ဒါဆုိရင္ Cell အေသမ်ားကုိ ဖယ္ရွားနုိင္ျပီး အသားရည္ အညီညာမႈေတြကုိ လည္းေပ်ာက္ကင္းေစနုိင္ပါတယ္။ သင္႔ေတာ္ရာနဲ႔ Mark လုပ္ျပီးေတာ႔ မ်က္နွာကုိေရသန္႔သန္႔ နဲ႔ ေဆးေၾကာပါ။ ဒါဆုိရင္ မ်က္နွာေလးဟာ ထူးျခားစြာ ၾကည္လင္၀င္းလဲ႔ လာပါျပီ။ အားလုံး ျပီးသြားျပီ ဆုိရင္ေတာ႔ ေခြ်းေပါက္မ်ားကုိ ပုံမွန္အတုိင္းျဖစ္ေစဖုိ႔ နဲ႔ တင္းရင္းေစဖုိ႔ Toning Lotion ကုိ ဂြမ္းနဲ႔တုိ႔ ျပီး မ်က္နွာ အနွံ႔လိမ္းေပးရပါမယ္။ ျပီးမွ မလိမ္းမျဖစ္ Moisturizer တစ္ခုခု ကုိလိမ္းပါ။ ဒါဆုိရင္ မ်က္နွာကို လံုး၀ Facial လုပ္ျပီးသြားျပီ။

Facial လုပ္ျပီး မ်က္ႏွာ နုနယ္ေနစဥ္မွာ ေနေရာင္နဲ႔ ခ်က္ခ်င္းမထိေတြ႕သင္႔ပါဘူး။ ၃နာရီေလာက္ အခ်ိန္ေပးျပီးမွ အျပင္ထြက္သင္႔ပါတယ္။ မိတ္ကပ္၊ ေပါင္ဒါေတြကုိ လည္းခ်က္ခ်င္း မလိမ္းသင္႔ပါဘူး။

The Secret to HAPPINESS

အဆင့္ (၁) အခ်ိန္ ၁၀မိနစ္ ယူပါ။

အဆင့္ (၂) ဒီေဆာင္းပါးကို ဖတ္ၾကည့္ပါ။ စိတ္သစ္ လူသစ္ ျဖစ္လာပါလိမ့္မယ္။

ေပ်ာ္ေပ်ာ္ရႊင္ရႊင္ အားရပါးရ ရယ္ခဲ့တာ ေနာက္ဆံုး ဘယ္အခ်ိန္ကလဲ။ စဥ္းစားေနရတယ္ ဆိုရင္ေတာ့ ရယ္ခဲ့ ရတာ ၾကာၿပီ ျဖစ္မယ္။ ဒါေပမဲ့ သတင္းေကာင္းက ဒီအေျခအေနကို ေျပာင္းလဲ ပစ္ႏိုင္တယ္ ဆိုတာပါပဲ။ ပညာရွင္ေတြ သေဘာတူထားတဲ့ အခ်က္ တစ္ခ်က္က ေပ်ာ္ရႊင္မႈရဲ့ အဓိကက ကိုယ့္ရဲ့ စိတ္ခံစားမႈေတြကို နားလည္တတ္ဖို ့ပါပဲ။ တစ္ႏွစ္ပတ္လံုး ေပ်ာ္ရႊင္ ခ်မ္းေျမ့ေစေရး ရိုးရွိးးရွင္းရွင္း နည္းလမ္းမ်ားကို ေဖာ္ျပ လိုက္ပါတယ္။

လစဥ္ လုပ္ရမွာက

ေတြးေခၚ စဥ္းစားပါ။

ရည္မွန္းခ်က္ေတြထား၊ ႀကိဳးစားတယ္ ဆိုတာမ်ိဳးကို ပညာရွင္တခ်ိဳ ့ကေတာ့ သေဘာမက်ပါဘူး။ အဲဒါေတြက တခါတေလက်ရင္ အလကားေနရင္း ၀န္ပိသလို ျဖစ္ေနတတ္ပါတယ္။ သူတို ့ကေတာ့ ကိုယ့္ရည္မွန္းခ်က္ကို တကယ္ ေပါက္ေျမာက္ဖို ့ လက္ေတြ ့ က်က် ေတြးေခၚ စဥ္းစားပါလို ့ ဆိုပါတယ္။ ဆိုပါေတာ့ ကိုယ္က ဘယ္အားကစား သင္တန္းတက္ႏိုင္မွာလဲ။ ဘာဟင္းခ်က္စားမွာလဲ ဆိုတာမ်ိဳးေပါ့။ ဒါမွ စိတ္ဖိစီးမႈ မရွိပဲ ပန္းတိုင္ကို ေရာက္ႏိုင္မွာပါ။

စာတစ္ေစာင္ ေရးပါ။

တခ်ိဳ ့လူေတြက ကိုယ့္ကို ဒုကၡေပးတာမ်ိဳး ရွိတတ္ပါတယ္။ အဲဒီလူမ်ိဳးေတြေၾကာင့္ စိတ္ရႈပ္ရတတ္တာေပါ့။ စိတ္ပညာရွင္ လန္ဒါ ဆလဲက အႀကံတစ္ခု ေပးပါတယ္။ “အဲဒီ လူဆီက်ု စာတစ္ေစာင္ ေရးပါ။ စိတ္ထဲ ရွိသလို ေရးပစ္လိုက္။ ၿပီးေတာ့ စာအိတ္ထဲထည့္၊ လက္မွတ္ထိုး၊ အဲဒါၿပီးရင္ေတာ့ စာအိတ္ကို တစ္စစီ ျဖစ္သြားေအာင္ ဆြဲဆုတ္ပစ္လိုက္၊ ဒီလို လုပ္တာ စိတ္ကို ထြက္ေပါက္ေပးလိုက္ တာပါပဲ။ စိတ္ညစ္ေနတာေတြလည္း စာလိုပဲ တစ္စစီ ျဖစ္သြားပါေစ” တဲ့။

မိမိကိုယ္ကို ဂုဏ္ယူပါ။

အတိုင္ပင္ခံ စိတ္ပညာရွင္ ဂ်က္ကီမာဆန္ ေျပာတာ ရွိပါတယ္။ “စူပါ၀ိုးမင္း ျဖစ္ေအာင္ ႀကိဳးစားတာကို ရပ္တန္းက ရပ္လိုက္ေတာ့။ အဲဒီႀကိဳးစားမႈကေန က်ရႈံးတဲ့ ခံစားမႈမ်ိဳးကိုပဲ ေပးပါလိမ့္မယ္။ ကၽြန္မကေတာ့ ေဟာေျပာပြဲေတြ လုပ္တိုင္း စံျပပုဂၢိဳလ္အေနနဲ ့ အန္ဂ်လီနာဂ်ိဳလီကိုပဲ အားက်တယ္လို ့ ေျပာတတ္ၾကတယ္” တဲ့။

တကယ္တမ္းမွာေတာ့ ဒီတလမွာ ကိုယ့္အတြက္ ဂုဏ္ယူစရာ အေကာင္းဆံုးကိစၥကို ျပန္စဥ္းစားၾကည့္ပါ။ အဲဒါက ကိုယ္ဟာ ဘာမွ မဟုတ္ဘူးလို ့ ခံစားမိမဲ့အစား ကိုယ့္ရဲ့ ေအာင္ျမင္မႈအေပၚ သာယာတဲ့ စိတ္မ်ိဳး ျဖစ္လာေစမယ္တဲ့။

Wednesday, March 3, 2010

ေဆးမွာတစ္မူၾကက္သြန္ျဖဴ


(၁) ၾကက္သြန္ျဖဴကုိ စားသံုးျခင္းျဖင္႔ သလိပ္၇ွင္းသည္။ ဆီးကုိ၇ႊင္ေစသည္။ အလြယ္တကူ က်ေ၇ာက္ တက္သည္႕ ေ၇ာဂါပိုးမ်ားကုိလည္း ကာကြယ္ ေပးႏုိင္သည္။ ကင္ဆာဆဲလ္မ်ား ျဖစ္ေသာ ကာစီႏုိဂ်င္ (Carcinogens) မ်ားကို ဟန္႔တားေျခဖ်က္ ႏုိ္င္စြမ္း ၇ွိေၾကာင္းပင္ ျဖစ္သည္။

(၂) ၾကက္သြန္ျဖဴတြင္ ပါ၀င္ေသာ ေအာ္ဂင္ႏုိဆာလ္ဖာ ျဒပ္ေပါင္းသည္ ၀မ္းတြင္း၇ွိ ဗက္တီး၇ီးယားမ်ားကုိ ဟန္႔တား ႏုိင္သည္။ အစိမ္းလုိက္စားျခင္းျဖင္႔ ၀မ္းတြင္းကင္ဆာ ျဖစ္မႈကုိ ပေပ်ာက္ေစႏုိင္ေၾကာင္း


(၃) အမ်ဳိးသမီးမ်ားတြင္ ျဖစ္တက္ ေလ႔၇ွိေသာ ၇င္သား ကင္ဆာဆဲလ္ (Breast Cancer Cell) မ်ားတုိးပြားမႈကုိ ၇ပ္ဆိုင္းေစသည္။ ၾကက္သြန္ျဖဴသည္ ၇င္သားကင္ဆာ ျဖစ္မႈကုိဟန္႔တားေစ ႏုိင္ေၾကာင္း


(၄) ၾကက္သြန္ျဖဴွွဆီသည္ ပင္ပန္းႏြမ္းနယ္မႈ Stress ကုိလည္း ေလ်ာ႔နည္းသက္သာ ေစႏုိင္ေၾကာင္း

(၅) ၾကက္သြန္ျဖဴသည္ အူမၾကီး၊ စအုိ၊ အစာ ေ၇မ်ဳိႏွင္႔ အေ၇ျပားတြင္ ျဖစ္ပြားေစတက္ေသာ အဖုအၾကိတ္မ်ား၏ ၾကီးထြား မႈကုိဟန္႔တားေေစနုိင္ေၾကာင္း

(၆) ေန႔စဥ္ ၾကက္သြန္ျဖဴဥ တစ္လုံးကုိ ူစားသံုးျခင္းျဖင္႔ ကုိလက္စေ၇ာ ၉% က်ဆင္းေစနုိင္ေၾကာင္း၊ ကုိလက္စေ၇ာ ၁% က်ဆင္းတုိင္း ႏွလုံး ေသြးေၾကာက်ဥ္း ေ၇ာဂါျဖစ္၇န္ အလားအလာမ်ား၂% ေလ်ာ႔နည္းသြားေၾကာင္း

(၇) ခႏၶာကိုယ္တြင္း၇ွိ အဆိပ္အေတာက္မ်ားကုိ ကာကြယ္ေစနုိင္ေၾကာင္း၊ အေ၇ျပားေပၚတြင္ ျဖစ္ပြားတတ္သည္႔ မွကၡ၇ုေ၇ာဂါႏွင္႔ အေ၇ျပားမႈိစဲြေ၇ာဂါမ်ားကုိ ေပ်ာက္ကင္းေစနုိင္ေၾကာင္း၊ အေအးမိ၊ ႏွာေစး၊ ေခ်ာင္းဆုိး၊ တုတ္ေကြး ျဖစ္ျခင္းႏွင္႔ ေလျပြန္ေ၇ာင္၇မ္းျခင္း၊ အဆစ္အျမစ္ေ၇ာင္ျခင္း တုိ႔ကုိသက္သာေပ်ာက္ကင္းေစနုိင္သည္။

(၉) ၾကာ၇ွည္စားသံုးလွ်င္ ဆံပင္နက္၍ သုတ္ကုိပြားေစသည္။

(၁၀) ၾကက္သြန္ျဖဴသည္ အဆီကုိ က်ေစနုိင္သျဖင္႔ ေန႔စဥ္မွန္မွန္ စားသံုးပါက ေသြးတုိးေ၇ာဂါ မျဖစ္ေစ၇န္ႏွင္႔ ျဖစ္ပြားေနေသာ ေသြးတုိးေ၇ာဂါကုိ ေပ်ာက္ေစနိုင္သည္။ ေသြးအဆီပိတ္သည္႔ ေ၇ာဂါကိုေျဖ၇ွင္း နုိင္စြမ္း၇ွိသည္။

(၁၁) မလုိအပ္ေသာအဆီမ်ားကုိ ေပ်ာ္၀င္ေစသည္သာမက ဆံုဆို႔နာ၊ အဆုတ္နာမ်ား ကုိအပါအ၀င္ ပိုးမႊားမ်ား ကို သတ္နုိင္ေၾကာင္း ႏွင္႔ ပင္နီဆလင္ေဆးအျပင္ အျခားပဋိဇီ၀ေဆး အခ်ိဳ႕ထက္အစြမ္းထက္ေၾကာင္းကို UPI သတင္းတစ္ခုက ဆုိထားသည္။

(၁၂) ၾကက္သြန္ျဖဴကို ပါးပါးလွီးေထာပတ္ႏွင္႔ေၾကာ္ ထမင္းႏွင္႔ နယ္စားပါက ၀မ္းကုိက္ေ၇ာဂါကုိ ေပ်ာက္ေစနုိင္သည္။

(၁၃) ဆီးႏွင္႔၀မ္းကုိ၇ႊင္ေစ သျဖင္႔ မီးဖုတ္စားေသာ္ ေလကိုအထူး၇ႊင္ေစနုိုင္သည္။ ၀မ္းေေဖာ၊ ၀မ္းေ၇ာင္၊ ၀မ္းကုိက္ေ၇ာဂါမ်ားကုိေပ်ာက္ေစ နုိင္သည္။

(၁၄) ၾကက္သြန္ျဖဴဥတစ္လုံးကုိ ေၾကးခ်ိတ္ႏွင္႔ေဖာက္၍ ပ်ား၇ည္တြင္ စိမ္ထားျပီး စားသုံးပါက အိပ္ေပ်ာ္စား၀င္ အားအင္ျပည္႕ ျဖိဳးေစနုိင္ျပီး က်န္းမာေ၇းပို၍ ေကာင္းေစသည္။

(၁၅) ၾကက္သြန္ျဖဴကုိ အဆီထုတ္၍ တုိက္ေကြ်းပါက သလိပ္၇ႊင္ေစသည္။ ေခ်ာင္းဆုိးသလိပ္ကပ္ျခင္းတုိ႔ကုိ ေပ်ာက္ေစသည္႕အျပင္ ေ၇ာဂါပိုးမ်ားကုိလည္း ေသေစနုိင္သျဖင္႔ ျမစ္ေျခာက္နာေခၚဘ အဆုတ္နာ(တီဘီ) ေ၇ာဂါမ်ားအတြက္ကုိလည္း တုိက္ေကြ်းနုိင္သည္။

(၁၆)ကေလးမ်ားေလဆန္နာျဖစ္ခဲ႔ပါက ၾကက္သြန္ျဖဴဥ တစ္လုံးကုိ မီးဖုတ္ေကြ်းျခင္းျဖင္႔ေပ်ာက္ကင္းေစ နိုင္သည္။

(၁၇) ၾကက္သြန္ျဖဴကုိ နွမ္းဆီ၊ ေလညွင္းတို႔နွင္႔ ေ၇ာစပ္က်ိဳခ်က္ျပီး လိမ္းေဆးအဆီအျဖစ္ျပဳလုပ္၍ လိမ္းေပးျခင္းျဖင္႔ ကုိယ္လက္ကုိက္ခဲျခင္း၊ နားျပည္ယိုျခင္းမ်ားကုိ သက္သာေစသည္။


ေရႏွင္႔က်န္းမာေရး


ေရခ်ိဳးေသာစနစ္

ေရခ်ိဳးေသာ အခ်ိန္မွာ ေန႔မႊန္းမတည္႕မီ နံနက္ပုိင္း အခ်ိန္ ျဖစ္၏။ ေယဘုယ်အားျဖင္႔ ေန႔လည္ ၁၂နာ၇ီ မထုိးမီေန႔အခ်ိန္ျဖစ္၏။ နံနက္ပုိင္းသည္ တက္ဥတုအခ်ိန္ ျဖစ္ျပီး၊ ညေနပုိင္းသည္ သက္ဥတုအခ်ိန္ ပိုင္းျဖစ္ေလသည္။ ေဆာင္းတစ္ဆယ္၊ ေႏြကုိး၊ မုိးခုနွစ္ ေရခ်ိဳးစနစ္သည္ အေကာင္းဆံုး ျဖစ္သည္။ အခ်ဳိ႕ အလုပ္မ်ား၍ ကုိယ္ခႏၶာ ညစ္ေပေနသူတုိ႔မွာ ေနမ၀င္မီ ေ၇ခ်ိဳးသင္႔သည္။ ေန၀င္ျပီးသြားပါက ေရမခ်ိဳးသင္႔ေတာ႔ပဲ ေျခလက္ေဆးေၾကာျခင္း အမႈသာျပဳသင္႔၏။

ေရမခ်ဳိးသင္႔ေသာအခ်ိန္

အစာစားျပီးစ၌ ခ်က္ခ်င္း ေရမခ်ိဳးသင္႔ေခ်။ အစာမေၾက ေရာဂါ ရရိွတက္၏။ ေနပူ၊ မီးပူ၊ အပူ တစ္စံုတစ္ခု ခံစားရျပီး စ၌လည္း ေရမခ်ိဳးသင္႔ေခ်။ ေလျဖတ္ေရာဂါ၊ ေသြးတုိးေရာဂါ၊ နား၊ မ်က္စိ၊ ခံတြင္းနာရိွသူမ်ား၊ ၀မ္းေဖာ၀မ္း ေရာင္သူမ်ား၊ နွာေစးသူမ်ားမွာ ထုိအခုိက္အတန္႔တြင္ ေရမခ်ဳိးဘဲေနသင္႔၏။ မီးအပူခံျပီးေနာက္ ေရခ်ိဳးလုိလွ်င္ ေရေအးကုိ၀ေအာင္ေသာက္ ျပီးေနာက္ ခဏေလာက္ နားနားေနေန၊ ေနထိုင္ျပီးမွ ေရခ်ိဳးပါ။ မက်န္းမမာ ျဖစ္ျပီးေနာက္ ပထမဆံုး ေရမခ်ဳိးေသးပဲ၊ ကရက္မက္နံသာမ်ား ေသြးလိမ္းၾကည္႕ပါ၊ တစံုတရာ အျပစ္မရွိမွ ေရစခ်ိဳးပါ။ ေရခ်ဳိးျပီးအခိုး ျပန္ရေအာင္ ျပဳလုပ္ရမည္။ ေရခ်ိဳးျပီးျပီးခ်င္း အ၀က္သန္႔သန္႔ျဖင္႔ ေရေပါက္ေရစမ်ား တစ္ကုိယ္ လုံးသန္႔စင္ေအာင္ သုတ္ပစ္ပါ။ ျဖစ္နုိင္ပါက ကုိယ္ေငြ႕ရလာသည္အထိ အ၀တ္သန္႔သန္႔ျဖင္႔ပြတ္တုိက္ေပး ရမည္။ ေရသုတ္ျပီးလွ်င္ အျမန္ဆုံး အ၀တ္သစ္လဲ၍ ေလလံုေအာင္ေနပါ။ ေရေႏြးပူပူ၊ ေကာ္ဖီပူပူ၊ ႏြားနုိ႔ပူပူ တစ္ခုခုကုိ ကုိယ္ေငြ႔အားေကာင္းလာေအာင္ ေသာက္ေပးပါ။ တက္နုိင္လွ်င္ ကုိယ္ေငြ႔ရေအာင္ (၁၅) မိနစ္ခန္႔ ေခါင္းျမီးျခဳံ၍ လဲေလ်ာင္းေနပါ။

ေရစခ်ိဳးပံု

ေရခ်ိဳးေတာ႔မည္ဆိုလွ်င္ ခ်က္ခ်င္းမခ်ဳိးေသးပဲ ေျခေထာက္ေအာက္ပုိင္းကုိ ေရအရင္ေလာင္းရမည္။ ေျခဖ်ားမွသည္ ဒူးေခါင္း၊ ေပါင္ စသည္ျဖင္႔ တေရြ႕ေရြ႕အထက္သို႔ ေလာင္းျပီးမွ တစ္ကုိယ္လုံး ခ်ဳိးရမည္။
ေရခ်ိဳးစဥ္ ပထမ ကိုယ္စိုရံု ေလာင္းျပီးမွ ေခတၲနားပါ။ အတြင္းအခုိးမ်ားထြက္ရန္ အခ်ိန္အနည္းငယ္ေပးျခင္းျဖစ္၏။
အထူးသျဖင္႔ ေခါင္းနွင္႔ပက္သက္ေသာ ေရာဂါ၇ိွသူမ်ား ေခါင္းေလာင္း၍ ေရမခ်ိဳးသင္႔ေခ်။
ေရွးဦးစြာ ေရမခ်ဳိးမီ ေရကုိပါးစပ္ အတြင္း၌ ငံုထားပါ။ သုိ႔မွသာ ခႏၶာကုို္ယ္ အတြင္း၇ွိ အပူအပုပ္ မ်ားရန္မွ ကာကြယ္ျပီး ျဖစ္မည္။ သြားနွင္႔စပ္ေသာ ေရာဂါမ်ားလည္း ကင္းရွင္းေစ နုိင္သည္။

ေရခ်ဳိးသင္႔သည္ကုိသိပံု

မိမိ ေရခ်ိဳးမည္ဟုျပဳစဥ္ ေအာင္ပါလကၡဏာမ်ား ျဖစ္ပါက ေရမခ်ိဳးဘဲေနက အျပစ္ကင္း၏။ ခ်ဳိးေသာ္လည္း ေရတစ္မွဳတ္ နွစ္မွဳတ္ခန္႔သာ ေရခ်ိဳးသည္ဆုိရံု ခ်ိဳးသင္႔သည္။ (သို႔) ေရဖက္တုိက္ျခင္း၊ ေရေႏြးျဖင္႔ ခ်ိဳးျခင္းျပဳအပ္၏။
(၁) ဗဟိဒၶတြင္ အပိတ္အဖဲြ႕ မ်ား၍ လြန္စြာေအးေသာအခါ
(၂) ေရခ်ိဳးမည္ဟု ေရနားသြားလွ်င္ ခ်မ္းစိမ္႔စိမ္႔ ျဖစ္ျပီး ၾကက္သီးထေသာအခါ၊
(၃) ေရခ်ိဳးလုိစိတ္မ၇ိွေသာအခါ
(၄) အဖ်ားရိွေနေသာအခါ ေရမခ်ိဳးဘဲေနက အျပစ္ကင္း၏။

ေခ်းတြန္းျခင္း

ဆီးျဖဴသီးျဖင္႔ ေခ်းတြန္းျခင္းမွာ သည္းေျခနာ၊ ၾကက္မ်က္သင္႔ေသာ အနာကုိနုိင္၏။ ပဲတဲေကာ၊ ႏြားေျဖ၇င္မွဳန္႔တုိ႔ျဖင္႔ ေခ်းတြန္းလွ်င္ သလိပ္နာႏွင္႔ ညအခါမျမင္၇ေသာ ၾကက္မ်က္သင္႔နာကုိေကာင္းေစသည္။ ဇီးျဖဴသီးမွဳန္႔ျဖင္႔ ေခ်းတြန္းလွ်င္ မ်က္စိအားေကာင္းေစသည္။

လွေစခ်င္သူ


A-Almond Oil ဗာဒံသီးအဆီီမ်က္ႏွာသန္႔စင္ရာတြင္ အေကာင္းဆုံးအဆီ ျဖစ္ပါသည္။ အဆီျပန္ျခင္း ႏွင္႔၀က္ျခံ၊ တင္းတိတ္မ်ားကုိ ေပ်ာက္ကင္းေစျပီး အသားအေရကို ေခ်ာေမြ႕ နဳးညံ႕ ေစပါသည္။ ထို႔ေၾကာင္႔ ဗာဒံသီး အဆီျဖင္႔ မ်က္နွာကုိ ပြတ္လိမ္းေပးပါ။


B-Baking Soda မုန္႔ဖုတ္ဆိုဒါ
မုန္႔ဖုတ္ဆုိဒါ ထမင္းစာဇြန္း တစ္ဇြန္းခန္႔ကုိ ေရေႏြးထဲထည္႕ ျပီးေမႊျပီး ေျခေထာက္ကုိ စိမ္ေပးလွ်င္ ေျခေထာက္နာက်င္ကုိက္ခဲ မႈမ်ားကုိ သက္သာေပ်ာက္ကင္း ေစပါသည္။ ေျခေထာက္မွ အနာအဆာမ်ားကုိ ေပ်ာက္ကင္းေစ၍ ေခ်ာေမြ႕နဳးည႕ံလာေစပါသည္။


E-Egg White ၾကက္ဥအကာ
မ်က္ႏွာအသားအေရ တင္းရင္၍ ေခ်ာေမြ႔ေစရန္း မ်က္ႏွာေပၚတြင္ လိမ္းက်ံေပးပါ။


0-0at Meal အုတ္ဂ်ဳံ
အုတ္ဂ်ံဳကုိ ထမင္းခ်က္သကဲ႔သုိ႔ ခ်က္ျပီးပ်ားရည္ တြင္စိမ္ပါ။ အဲဒါကုိ မ်က္ႏွာတြင္ လိမ္းက်ံေပးပါက မ်က္ႏွာ အဆီျပန္ျခင္းမွ ေပ်ာက္ကင္း သက္သာေစနုိင္ပါသည္။


I-Ice Cubes ေရခဲတုံးေလးမ်ား
မ်က္နွာနွင္႔ လည္ပင္းတြင္ ပိတ္ဆို႔ေနေသာ ေခြ်းသီးေပါက္ကေလးမ်ားကုိ ေရခဲတုံးျဖင္႔ အံုေပးပါက ေခြ်းေပါက္ပြင္႔ျပီး အခုိးအေငြ႔ထြက္ကား က်န္းမားလန္းဆန္းေစပါသည္။


M-Milk ႏြားနုိ႔
ႏြားနုိ႔ျဖင္႔ ေရခ်ိဳးသကဲ႔သို႔ ခ်ိဳးျခင္းျဖင္႔၊ ေျခလက္ ေဆးေၾကာသန္႔စင္ျခင္း၊ ပြတ္လိမ္းေပးျခင္းျဖင္႔ ေျခလက္မ်ား နဳးညံ႕ ေပ်ာ႔ေပ်ာင္းေစပါသည္။


S-Strawberries စေတာ္ဘယ္ရီသီး
စေတာ္ဘယ္ရီသီးကုိ ပါးပါးလွီး၍ အေရျပားေပၚရွိ မွဲ႔ေျခာက္တင္းတိတ္မ်ားကုိ အုံေပးပါက ေပ်ာက္ကင္းေစနုိင္ပါသည္။ အညိဳအမဲ အကြက္မ်ားရွိလွ်င္လည္း အံုေပးပါက ေပ်ာက္ကင္းေစပါသည္။


F-Fasting
တစ္လတြင္ တစ္ရက္သတ္မွတ္ကာ ထိုေန႔တြင္ အစာမစားဘဲ အရည္ရြမ္းေသာ သစ္သီးရည္မ်ား ကုိေသာက္သုံးေပးပါ။ ဤနည္းျဖင္႔ ခႏၶာကုိယ္ မွအဆိပ္အေတာက္မ်ား ကင္းစင္ေစျပီး အသားေရ စိုျပည္လွပေစပါသည္။


L-Lemon Juice သံပရာႏွင္႔ ေရွာက္ခ်ိဳသီးအရည္
အေရျပားကုိ ပြတ္လိမ္းေပးပါက အေရျပားမွ အညိဳကြက္၊ အမည္းကြက္မ်ား အစြန္းအထင္းမ်ားေပက်ံ ေပ်ာက္ကင္းေစသည္။ မွဲ႔ေျခာက္ႏွင္႔ ညုင္းမ်ား ေပ်ာက္ကင္း၍ ေခ်ာေမြ႔လွပလာေစပါသည္။


(မဂၢင္းဇင္းတစ္အုပ္မွ ကူးယူေဖာ္ျပျခင္းသာ...)

Tuesday, March 2, 2010

Object Selection

Introduction

Before you start to use the AutoCAD Modify commands, you need to know something about selecting objects. All of the Modify commands require that you make one or more object selections. AutoCAD has a whole range of tools which are designed to help you select just the objects you need. This tutorial is designed to demonstrate the use of many of the selection options. As with so many aspects of AutoCAD, developing a good working knowledge of these options can drastically improve your drawing speed and efficiency.

Selecting Objects by Picking

Perhaps the most obvious way to select an object in AutoCAD is simply to pick it. Those of you who have used other graphics based utilities will be familiar with this concept. Generally all you have to do is place your cursor over an object, click the mouse button and the object will be selected. In this respect AutoCAD is no different from any other graphics utility.

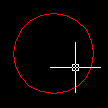
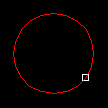
When you start a Modify command such as ERASE, two things happen. First, the cursor changes from the usual crosshairs to the pickbox and second, you will the the "Select objects" prompt on the command line. Both of these cues are to let you know that AutoCAD is expecting you to select one or more objects.

Select objects:

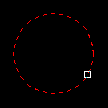
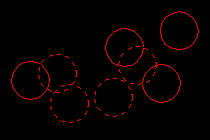
To select an object, place the pickbox over a part of the object and left-click the mouse. When the object has been picked it is highlighted in a dashed line to show that it is part of the current selection and the command line reports "1 found". You will now see the "Select objects" prompt on the command line again. At this point you can continue adding more objects to the current selection by picking them or you can press Return or the Space Bar to complete the selection.

The Cross-hairs The Pickbox A Highlighted Object
The Crosshairs The Pickbox Highlighted Object

When you pick one or more objects in response to the "Select objects" prompt, you are effectively creating a selection set. Selection sets are an important concept in AutoCAD because they can be used to great effect, especially when drawings become large or complicated.


An Example

Follow the example below to get an idea how a selection set can be created by picking objects.

Draw Two Circles

Draw two circles using the CIRCLE command, DrawCircleCenter, Radius from the pull-down menu or Circle from the Draw toolbar. The size and position of the circles does not matter.

Command: CIRCLE
Specify center point for circle or [3P/2P/Ttr (tan tan radius)]: (pick a point in the middle of the drawing window)
Specify radius of circle or [Diameter] <8.3453>: (pick another point to define the circle circumference)
Command: CIRCLE
Specify center point for circle or [3P/2P/Ttr (tan tan radius)]: (pick the center point of the second circle)
Specify radius of circle or [Diameter] <37.9174>: (pick another point to define the circle circumference)

Erase the Two Circles

Erase the two circles using the ERASE command, ModifyErase from the pull-down or Erase from the Modify toolbar.

Command: ERASE
Select objects: (place the pickbox over a circle circumference and left-click)
1 found
Select objects: (place the pickbox over the second circle circumference and left-click)
1 found
Select objects: (press Return to complete the selection and erase the objects)

Creating selection sets by picking objects can become quite tedious if you want to select a large number of objects. Just imagine having to pick a hundred or more objects in a large drawing! Fortunately AutoCAD provides a number of selection options which can help you select objects more efficiently.


Window Selection

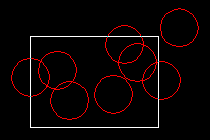
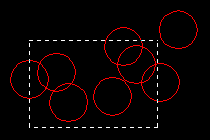
The Window option is invoked by typing W in response to the "Select objects" prompt. Window allows you to define a rectangle using two points in exactly the same way as the RECTANGLE command. Once the window is defined, all objects which lie entirely within the window will be selected.

Window selection Objects within Window
The Window selection box is shown
as a rectangle with a solid line
Only objects entirely within the
window will be selected

Command Sequence

Command: (start one of the Modify commands such as ERASE)
Select objects: W
First corner: (pick first corner)
Specify opposite corner: (pick second corner)
Select objects: (at this point you can either select more objects or Return to complete the selection set and continue with the current command.)


Crossing Window Selection

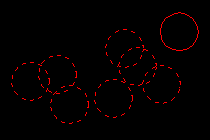
The Crossing Window option is invoked by typing C at the "Select objects" prompt and is a variation of the Window command. The command sequence is exactly the same but objects are selected which lie entirely within the window and those which cross the window border.

Crossing selection Objects crossing Window
The Crossing selection box is shown
as a rectangle with a broken line
Objects within and crossing the
window will be selected


Implied Windowing

Although you can explicitly invoke the Window and Crossing Window selection boxes by entering W or C at the keyboard when prompted to "Select objects", in practice this is rarely done. Both of these selection options are so commonly used that AutoCAD provides a method of implied windowing so that you don't have to use the keyboard at all. You can test this out without using any command. If you pick a point in space on the graphic window, you will notice that AutoCAD automatically assumes that you want to define a selection window and uses the pick point as the first point of that window. If you move the cursor to the right of the pick point you will get a Window selection box (solid line). If you move the cursor th the left you will get a Crossing Window selection box (broken line). With a little bit of practice the use of implied windowing can make the whole drawing process very efficient and you will rarely find yourself having to explicitly invoke the window selection options from the keyboard.


The Undo option

It often happens that you inadvertently add objects which you don't want to a selection set during its compilation. When this occurs in the middle of a complicated selection it can be pretty annoying. Fortunately AutoCAD allows you to undo the last selection made during the compilation of a selection set. All you need do is enter U at the next "Select objects" prompt to remove the objects previously added.


Selecting All Objects

The All option is invoked by typing ALL at the "Select objects" prompt. You can use this option to select all the objects in the current drawing, no picking is required. Objects on Locked or Frozen layers are not selected but objects on layers which are simply turned off are selected.


Fence Selection

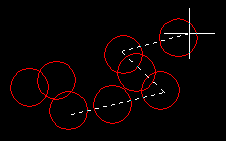
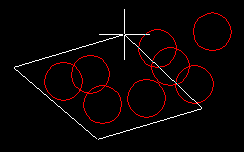
Fence in actionThe Fence option allows you to draw a multi-segment line, like a Polyline. All objects which cross the fence will be selected. The Fence option is invoked by typing F at the "Select objects" prompt.

Command:
(start one of the Modify commands such as ERASE)

Command Sequence

Select objects: F
First fence point: (pick first point)
Specify endpoint of line or [Undo]: (pick second point)
Specify endpoint of line or [Undo]: (pick another point or Return to end fence selection)
Select objects: (Return to complete the selection set or add more objects)


Window Polygon Selection

Window Polygon in actionThe Window Polygon option, invoked by typing WP is similar to the Window option except that you can define an irregular polygon shape within which objects will be selected. As with the Window option, only objects which fall entirely within the polygon will be selected.

Command Sequence

Command: (start one of the Modify commands)
Select objects: WP
First polygon point: (pick first point)
Specify endpoint of line or [Undo]: (pick second point)
Specify endpoint of line or [Undo]: (pick third point)
Specify endpoint of line or [Undo]: (pick another point or Return to end polygon selection)
Select objects: (Return to complete the selection set or add more objects)

A polygon is formed by picking at least three points.


Crossing Polygon Selection

The Crossing Polygon option can be used in exactly the same way as the Window Polygon option but it has the same selection criteria as the Crossing Window option, i.e. objects will be selected if they fall entirely within or touch the polygon boundary. This option is invoked by typing CP at the "Select objects" prompt.

Note: Lines, polygons and windows drawn using the selection options do not exist as drawing objects. Once the selection has been made they disappear.


Using a Previous Selection

AutoCAD always remembers the last selection set you defined. This is very useful because you may need to make a number of changes using different commands to the same group of objects. In order to re-select the last selection set you can use the Previous option. The previous option is invoked by typing P at the "Select objects" prompt.


Selecting the Last Object

You can select the last object created by entering L at the "Select objects" prompt.


Object Cycling

When drawings become complicated it is sometimes difficult to select the particular object you want because it is either very close to or overlies another object. In such a case it may happen that the other object is selected and not the one you want. Object cycling is designed to overcome this problem. If you make a pick whilst holding the Control (Ctrl) key down, AutoCAD will respond with "". If you continue to pick, each object near the pick point is highlighted in rotation. Just keep picking until the object you want is highlighted, then right-click or Return, AutoCAD responds "", the required object is added to the selection set and you can continue to select more objects as normal.


Adding and Removing Objects

AutoCAD provides two methods for adding and removing objects to and from a selection set. As you know, objects can be added to a selection set simply by picking them or by using one of the methods outlined above. You can remove selected objects from a selection set just as easily by shift picking. If you hold the Shift key down on the keyboard while picking a selected object, that object will be deselected (removed from the current selection set). You can tell when a selected object has been deselected because it is no longer highlighted. You can remove more than one object at a time by holding down the Shift key while using implied windowing. However, none of the other selection options which require keyboard input will work using the shift pick method.

If you need to remove a more complex selection from the current selection set you should use the Remove option to switch to Remove mode. If you enter R at the "Select objects" prompt, AutoCAD will respond:

Remove objects:

Objects now picked or selected using any of the above methods will be removed from the current selection set. When you have finished removing objects, you can return to Add mode by entering A at the "Remove objects" prompt.

You can use any combination of picking, selection options and add/remove modes to define your selection set. Once you are happy that you have selected all the objects you need, just hit Return to complete the selection process and to continue with the current command.

When you feel confident with the basic selection tools, have a look at the Advanced Selection tutorial to find out how to use AutoCAD's advanced selection tools for creating complex selection sets.


Tips & TricksHot Tips

  • When you are picking objects in a complex drawing, use the ZOOM command transparently to make object selection easier. All Zoom options selected from the toolbars are automatically transparent but if you invoke the command from the keyboard you will need to enter 'zoom.

Modifying Objects

Introduction

AutoCAD drawings are rarely completed simply by drawing lines, circles etc. Most likely you will need to Modify these basic drawing objects in some way in order to create the image you need. AutoCAD provides a whole range of modify tools such as Move, Copy, Rotate and Mirror. As you can see, the command names are easily understandable. However, the way these commands work is not always obvious. This tutorial is designed to show you how all of the Modify commands work. If you just need information quickly, use the QuickFind toolbar below to go straight to the information you need or select a topic from the contents list above.

Erase Copy Mirror Offset Array Move Rotate Scale Stretch Lengthen Trim Extend Break Chamfer Fillet Explode

As is usual with AutoCAD, the Modify tools can be accessed in one of three ways, from the keyboard, from the pull-down menu and from the toolbar. All of the Modify tools are available from the Modify pull-down and the Modify toolbar. In each section below, the toolbar, pull-down and keyboard options are given. The method you choose is entirely up to you. Ultimately you will use the method that you feel most comfortable with or the one you find most efficient. AutoCAD allows great flexibility and there aren't any right or wrong ways of working. That said, it should be pointed out that the use of toolbars in AutoCAD is almost always quicker than any other method.

Toolbar dialogue box

The Modify toolbar is usually displayed by default but if it is not already displayed, you can display it using the TOOLBAR command, ViewToolbars… from the pull-down menu. When the Toolbar dialogue box (shown above) appears, simply check the box next to "Modify" in the toolbars list. Many AutoCAD users work with the Modify toolbar permanently docked on their screen because it gives one-click access to all of the commands, making the drawing process much more efficient.

The Erase Command

Toolbar Modify Erase
Pull-down ModifyErase
Keyboard ERASE short-cut E

The Erase command is one of the simplest AutoCAD commands and is one of the most used. The command erases (deletes) any selected object(s) from the drawing. Remember you can always get deleted objects back by typing U to undo, Undo from the Standard toolbar or by using the OOPS command.

Command Sequence

Command: ERASE
Select objects: (pick an object to erase)
Select objects: Return (to end the selection and erase the object)

If you simply want to erase the last object you created you can type L at the "Select objects" prompt. The last object will be highlighted and you can then select more objects or Return to end the command. See the "Object Selection" tutorial for more information on selecting objects.


The Copy Command

Toolbar Modify Copy Object
Pull-down ModifyCopy
Keyboard COPY short-cut CP

The Copy command can be used to create one or more duplicates of any drawing object or objects which you have previously created. Copy is a very useful and time-saving command because you can create very complex drawing elements and then simply copy them as many times as you like.

Copying an object

Command Sequence

Command: COPY
Select objects: (pick object to copy, P1)
Select objects: Return (to end selection)
Specify base point or displacement, or [Multiple]: (pick P2 or M for multiple copies)
Specify second point of displacement or : (pick P3)

The multiple option allows you to create additional copies of the selected object(s) by picking as many new points as you like. To end a multiple copy, just hit the Return key.

Notice that the "Base point", P2 and the "Second point", P3 do not have to be picked on or near the object. The two points are simply used to indicate the distance and direction of the copied object from the original object.


The Mirror Command

Toolbar Modify Mirror
Pull-down ModifyMirror
Keyboard MIRROR short-cut MI

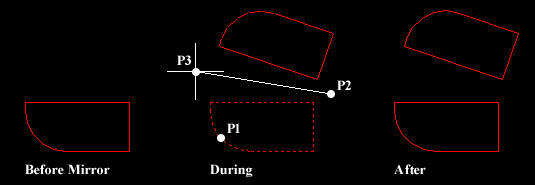
The Mirror command allows you to mirror selected objects in your drawing by picking them and then defining the position of an imaginary mirror line using two points.

Mirroring an object

Command Sequence

Command: MIRROR
Select objects: (pick object to mirror, P1)
Select objects: Return (to end selection)
Specify first point of mirror line: (pick P2)
Specify second point of mirror line: (pick P3)
Delete source objects? [Yes/No] : Return (for No to keep the original object)

Notice that in the command sequence above, pressing the Return key when asked whether to "Delete source objects?" resulted in a "No" response. This is because "No" is the default option. AutoCAD always shows the default option within triangular brackets, in this case "". Many AutoCAD commands offer default options. They are usually the most commonly used and you need only right-click and select "Enter" from the menu or press Return on the keyboard to accept them.

In order to create perfectly horizontal or vertical mirror lines use Ortho. For more information on the use of Ortho and other drawing aids, see the "Drawing Aids" tutorial.


The Offset Command

Toolbar Modify Offset
Pull-down ModifyOffset
Keyboard OFFSET short-cut O

Offset is probably one of the most useful commands for constructing drawings. The Offset command creates a new object parallel to or concentric with a selected object. The new object is drawn at a user defined distance (the offset) from the original and in a direction chosen by the user with a pick point. You can offset lines, arcs, circles, ellipses, 2D polylines, xlines, rays and planar splines.

Command Sequence

Command: OFFSET
Specify offset distance or [Through] <1.0000>: 10 (specify distance)
Select object to offset or : (select object, P1)
Specify point on side to offset: (pick direction, P2)
Select object to offset or : Return (to end or select another object to offset)

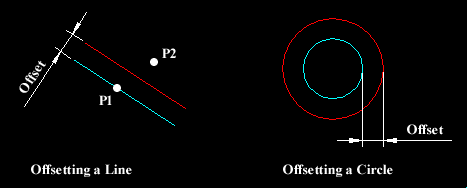
In the illustration below, a line (cyan) has been offset to the right through a distance "Offset" by picking a point to the right of the original line. The result is a new line (red) to the right of the original.

Offsetting

Circles can be offset inside or outside of themselves to create a new circle which is concentric (has the same centre point) with the original circle. In the illustration, a new circle (red) has been created outside of the original by picking a point outside of the original circle. The radius of the new circle is the offset distance "Offset" plus the radius of the original circle.

In the illustration above, the new objects and original objects are shown in different colours for clarity. In reality, offset objects inherit their object properties from the original object. See the "Object Properties" tutorial for details.

The Array Command

Toolbar Modify Array
Pull-down ModifyArray
Keyboard ARRAY short-cut AR

The Array command makes multiple copies of selected objects in a rectangular matrix (columns and rows) or a polar (circular) pattern. This command has been completely transformed in AutoCAD 2000i. It is now completely dialogue box driven with the option to see a preview of the array before it is created. You can also now create rectangular arrays at a user specified angle angle. This constitutes a major improvement in usability.

The Rectangular Array
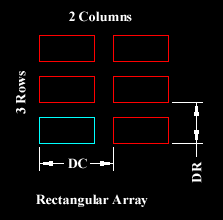
Rectangular Array The illustration on the right shows the results of a rectangular array with two columns an three rows. The distance between rows is indicated with the dimension DR and between columns with DC. When creating rectangular arrays it is important to remember that new rows are created above the original object and new columns are created to the right of the original object. The resulting array is, therefore, always created with the original object in the bottom left hand position with respect to the current co-ordinate system. In the illustration, the original object is shown in cyan and the new objects in red. It is possible to create arrays which do not align with the World Co-ordinate System by setting a User Co-ordinate System first. See the UCS tutorial for details.

Try creating this array yourself. First, draw a rectangle 20 drawing units wide and 10 drawing units tall. To do this, start the rectangle command DrawRectangle from the pull-down menu. When you are prompted to pick a point, pick somewhere in the lower left quarter of the drawing area. Then, when you are prompted for a second point, enter the relative cartesian co-ordinate @20,10. You have now drawn a rectangle at the right size. See the Using Co-ordinates tutorial for more information on drawing with co-ordinates.

Rectangular Array dialogue box

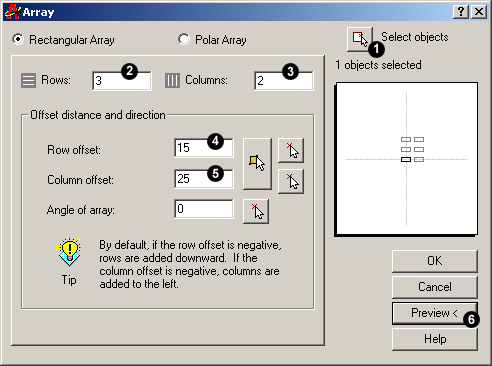
Now start the Array command.First of all, make sure that the Rectangular Array radio button is selected and that you are looking at the Rectangular Array dialogue box and now follow the steps below:

  1. Click the Select objects button. The dialogue box will temporarily disappear enabling you to select the rectangle you just drew. Press the Return button on your keyboard to complete the selection. You are now returned to the dialogue box and the message immediately below the Select Objects button should read "1 objects selected".
  2. Enter the number of rows required in the Rows edit box. For this example, enter the value "3". Notice that the schematic preview on the right hand side of the dialogue box updates to reflect the values you are entering.
  3. Enter the number of columns required in the Columns edit box. Enter the value "2".
  4. Enter the row offset in the Row Offset edit box. This is the distance DR in the illustration above. Note that tis is not the distance between rows. In this example, our rectangle is 10 units high and we will enter a row offset of 15. The result will be a 5 unit gap between rectangles.
  5. Enter the column offset in the Column Offset edit box. The same parameters apply as for the row offset. Enter a value of 25 to give a 5 unit gap between our rectangles.
  6. ArrayClick on the Preview button. Once again, the dialogue box disappears and the specified array is temporarily drawn so that we can preview it. We are now offered 3 choices. If the array isn't quite right, click the Modify button to return to the Array dialogue box. If you are happy with the array, click the Accept button, the array will be permanently drawn and the command is ended.

You should now have an array that looks similar to the one in the illustration above consisting of 6 rectangles arranged in 3 rows and 2 columns. As you can se, this command is very powerful and can save lots of time if used carefully.

The Polar Array

The polar array works in a similar way to the rectangular array. The main difference is that rather than specifying the number and offset for rows and columns, you must specify a center point and the total number of objects in the array (including the original object).

Polar Array dialogue box

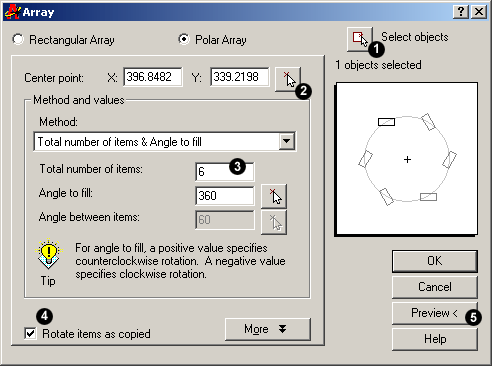
You can try this for yourself by drawing another rectangle as described above. This time, though, locate the rectangle in the centre top half of the drawing area. Now, start the Array command, click the Polar Array radio button and follow the steps below:

  1. Click the Select objects button. The dialogue box will temporarily disappear enabling you to select the rectangle you just drew. Press the Return button on your keyboard to complete the selection. You are now returned to the dialogue box and the message immediately below the Select Objects button should read "1 objects selected".
  2. Specify the center point for the array. This is the point C in the illustration below. You can do this by entering x and y co-ordinates into the appropriate edit boxes if you know what these values should be. However, this is rarely the case and most often you will want to click the Pick Center Point button to pick a point from the drawing area. Pick a point somewhere below the rectangle you have just drawn.
  3. Enter a value for the total number of items. For this example, enter the value "6". Notice that once again, the schematic preview updates to reflect the values you have entered.
  4. Make sure that the Rotate items as copied checkbox is checked.
  5. ArrayClick on the Preview button. Once again, the dialogue box disappears and the specified array is temporarily drawn so that we can preview it. We are now offered 3 choices. If the array isn't quite right, click the Modify button to return to the Array dialogue box. If you are happy with the array, click the Accept button, the array will be permanently drawn and the command is ended.

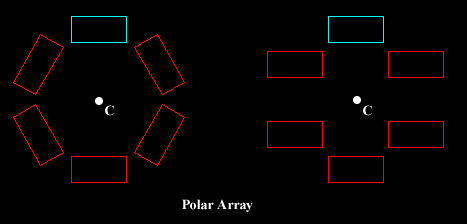
The array you have just drawn should look something like the one illustrated below, left. Take some time to play around with the other options in the Array dialogue box to see what they can do.

Polar Array

The illustration above shows the results of a polar array using an original rectangle (cyan) copied six times about a centre point C, through an angle of 360 degrees (full circle). The only difference between the array on the left and the one on the right is that the Rotate items as copied checkbox was not checked in the right hand example.

All new objects created with the Array command will inherit the object properties of the original object. See the "Object Properties" tutorial for information on object properties.


The Move Command

Toolbar Modify Move
Pull-down ModifyMove
Keyboard MOVE short-cut M

The Move command works in a similar way to the Copy command except that no copy is made, the selected object(s) is simply moved from one location to another.

Moving an object

Command Sequence

Command: MOVE
Select objects: (pick object to move, P1)
Select objects: Return (to end selection)
Specify base point or displacement: (pick P2)
Specify second point of displacement or : (pick P3)

Note that as with the Copy command, the two pick points, P2 and P3 are used only to indicate the distance and direction of movement.


The Rotate Command

Toolbar Modify Rotate
Pull-down ModifyRotate
Keyboard ROTATE short-cut RO

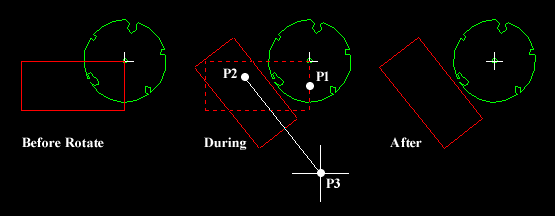
The Rotate command allows an object or objects to be rotated about a point selected by the user. AutoCAD prompts for a second rotation point or an angle which can be typed at the keyboard.

Rotating a rectangle

Command Sequence

Command: ROTATE
Current positive angle in UCS: ANGDIR=counterclockwise ANGBASE=0
Select objects: (pick object to rotate, P1)
Select objects: Return (to end selection)
Specify base point: (pick base point, P2)
Specify rotation angle or [Reference]: (pick second point, P3 or enter angle)

Remember, by default, AutoCAD angles start at 3 o'clock and increase in an anti-clockwise direction. The "ANGDIR" and "ANGBASE" variables remind you of this. If you want to rotate in a clockwise direction you can enter a negative angle by using a minus sign.

Note: You can change the angle direction and the base angle using the Units command, FormatUnits… from the pull-down menu. Click the "Clockwise" check box to change the direction and click the "Direction…" button to set the base angle.


The Scale Command

Toolbar Modify Scale
Pull-down ModifyScale
Keyboard SCALE short-cut SC

The Scale command can be used to change the size of an object or group of objects. You are prompted for a pick point about which the selection set will be scaled. Scaling can then be completed by picking a second point (not always easy because it can sometimes be difficult to precisely control the scaling) or by entering a scale factor at the keyboard. For example a scale factor of 2 will double the size of the objects in the selection set and a factor of 0.5 will half them.

Scaling an object

Command Sequence

Command: SCALE
Select objects: (pick objects to be scaled, P1)
Select objects: Return (to end selection)
Specify base point: (pick base point, P2)
Specify scale factor or [Reference]: (pick second point, P3 or enter scale factor)

In the example shown above, the original tree symbol has been enlarged by dynamically scaling it using pick points to determine the change in scale. If you want to scale an object precisely, it is much easier to enter a scale factor using the keyboard.

Note that the position of the new sized tree symbol is determined by the location of the base point. The base point, P2 has been picked to the upper right of the centre of the tree which resulted in the centre of the tree shifting to a lower left position. If the base point had been picked in the centre of the tree symbol, the tree would have remained in the same position. In theory the base point can be any point in the drawing area but for ease of control it is best to choose a known point so that the results are obvious.